Backup Microsoft SQL Server
Differential and incremental backup of your Microsoft SQL Server
Securely backup your company's running databases along with options to schedule backups, receive notifications and view log reports
To perform differential backup,
- Sign in to the IDrive® application and click 'Server Backup'. A slider menu will appear.
- Click 'MS SQL'. The MS SQL connection screen appears. By default, 'MS SQL backup' is selected.
- Provide the relevant authentication information when prompted. IDrive® provides two modes of MS SQL server authentication. You can connect to your database using:
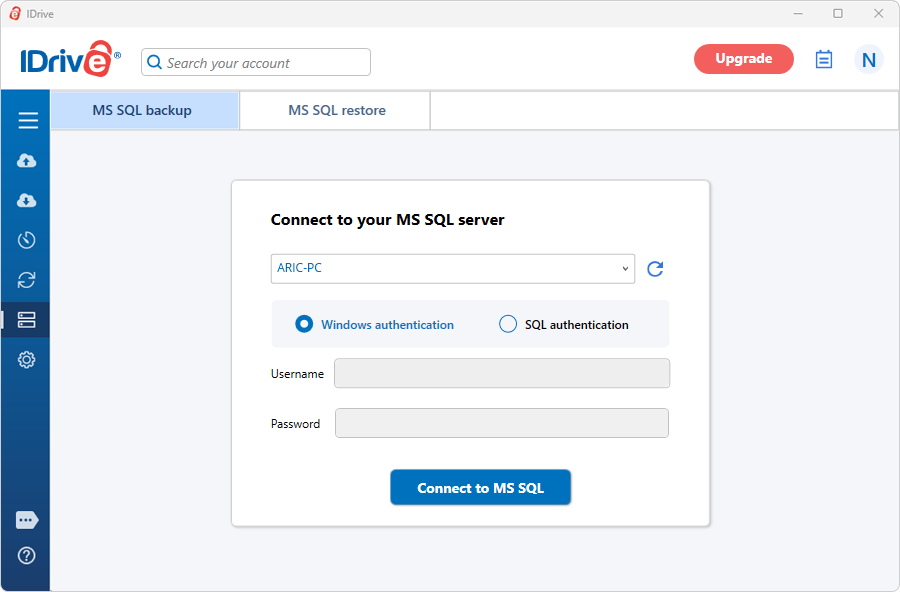
Windows Authentication Mode: When you connect through a Windows user account, MS SQL server validates the account name and password using the Windows principal token in the operating system. This means that your identity is confirmed by Windows. SQL server does not ask for the password and does not perform the identity validation. Windows Authentication is the default authentication mode and is more secure than SQL Server Authentication.
SQL Server Authentication Mode: When using SQL Server Authentication, logins are created in SQL server that are not based on Windows user accounts. Both the username and password are created by using SQL server and stored in SQL server. While connecting using SQL Server Authentication, you must provide your credentials (login and password) every time. When using SQL Server Authentication, you should set strong passwords for all SQL server accounts.
- Click 'Connect to MS SQL'.
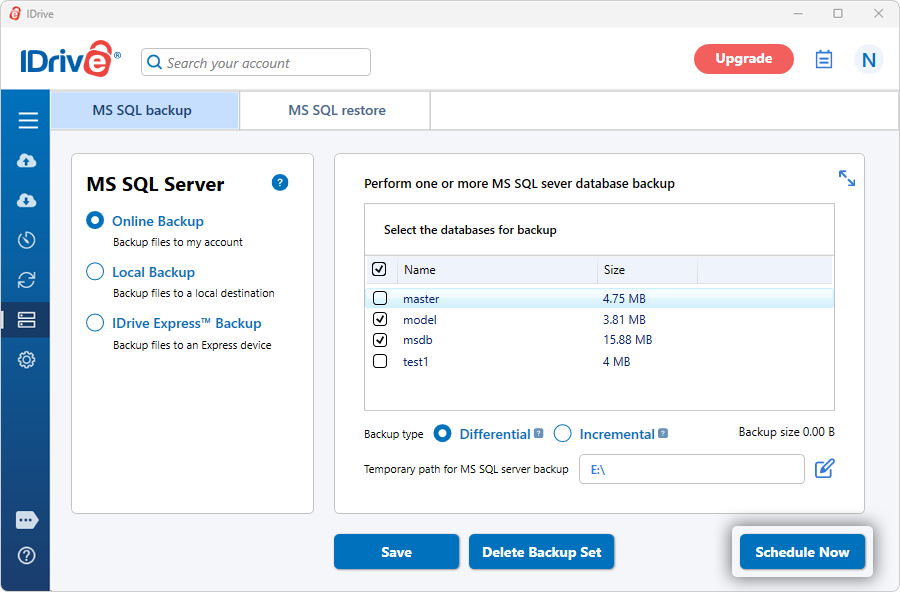
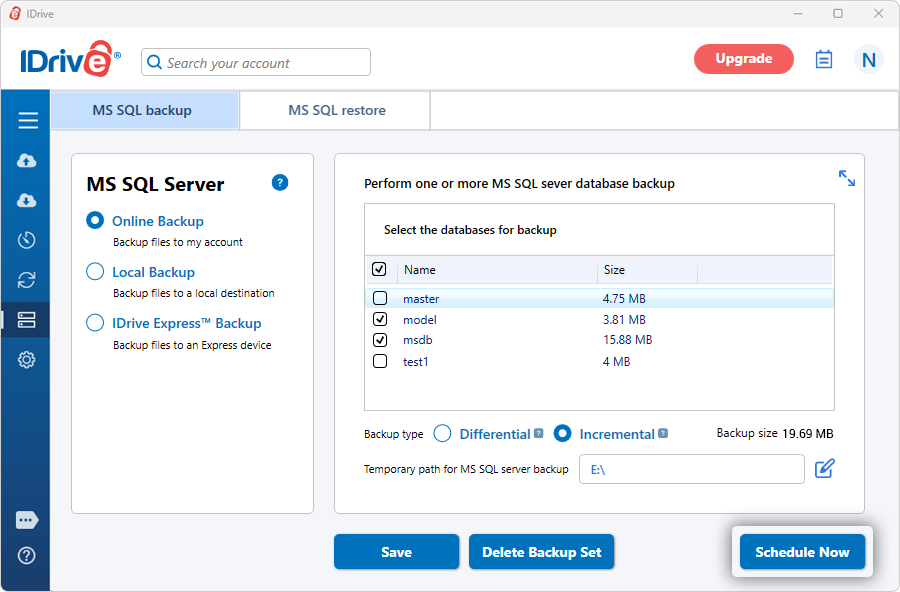
- Select 'Online Backup', or 'Local Backup', or 'IDrive Express™ Backup'.
Note: On selecting 'Online Backup', the data will be stored on the IDrive cloud whereas on selecting 'Local Backup' or 'IDrive Express™ Backup' the data will be stored in the local drive.
- Select the database(s) from the list which appears and specify MS SQL backup temporary path for local backup.
Note: Once the local backup is initiated, '.ServerBackup' folder is auto-created.
- Click 'Schedule Now'.
- The 'Scheduler' screen appears, from where you can schedule the backup for any future day and time or perform an immediate backup of the selected databases.
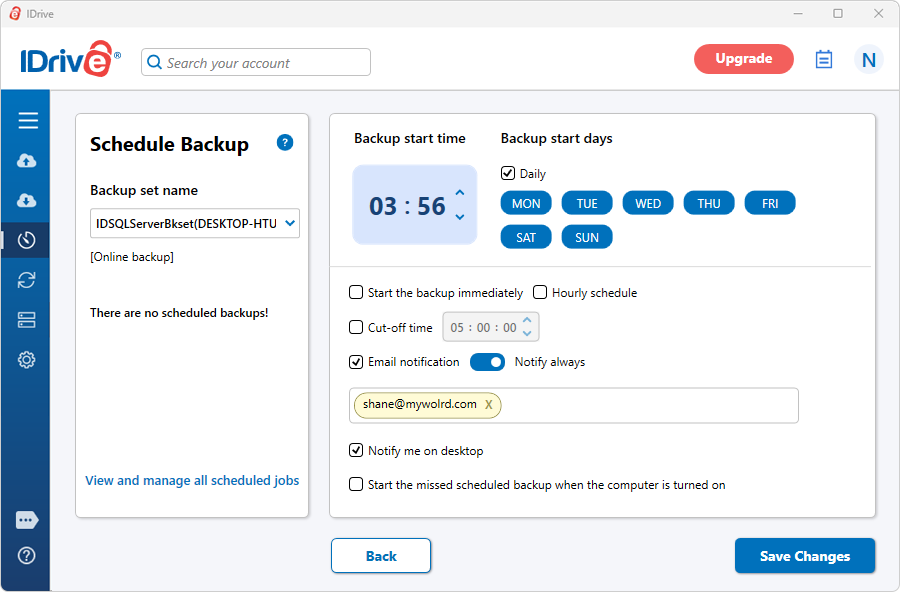
- Click 'Save Changes'.
Note: If you attempt to connect to an instance of MS SQL server by providing a blank login name, the SQL server uses the Windows Authentication. Additionally, if you connect to an instance of SQL server configured for Windows Authentication Mode using a specific login, the login is ignored, and the Windows authentication is used.
Note: IDrive® for Windows allows you to schedule the MS SQL server backup for different instances. For easy identification of the MS SQL server backup set, the name of the backup set will be 'IDSQLServerBkset' followed by the instance name scheduled for backup. Example: If the instance name is 'MJOHN\INSTMJOHN' then the name of the backup job is 'IDSQLServerBkset' (MJOHN##INSTMJOHN)'.
To perform incremental backup,
- Sign in to the IDrive® application and click Server Backup.
- Click 'MS SQL'. The MS SQL connection screen appears. By default, 'MS SQL backup' is selected.
- Provide the relevant authentication information when prompted. IDrive® provides two modes of MS SQL server authentication. Click 'Connect to MS SQL'.
- Select 'Online Backup', or 'Local Backup', or 'IDrive Express™ Backup'.
Note: On selecting 'Online Backup', the data will be stored on the IDrive cloud whereas on selecting 'Local Backup' or 'IDrive Express™ Backup' the data will be stored in the local drive.
- Select the database(s) from the list which appears and select the 'Incremental' option.
Note: To perform the incremental backup, database should be in a full/bulk-logged recovery model.
- Specify the local backup location and click 'Schedule Now'.
- In the 'Scheduler' that appears, schedule the backup for any future day and time or perform an immediate backup of the selected databases.
- Click 'Save Changes'.
View the steps to restore the MS SQL Server.